#Reed Diffuser Oil
Explore tagged Tumblr posts
Visit Tumblr Blog
Explore Tumblr blogs with no restrictions, modern design and the best experience.
Last Seen Tumblr Blogs


Fun Fact
The Tumblr office adopted Tommy, an 11-year-old Pomeranian.
Text
White Pillar Candles | Aura Decor
Aura Decor offers a variety of white unscented pillar candles suitable for different occasions and home decor needs. These high-quality candles come in various sizes and shapes, ensuring long-lasting burn times and a smokeless experience. Perfect for creating a serene ambiance, they are ideal for events, relaxation, or daily use.

0 notes
Text
Fragrant Flourishes: Creative Ways to Display Reed Diffusers
Reed diffusers have become one of the hottest trends in home fragrance these days. These delightful accessories can infuse the living spaces with exquisite fragrances and help alleviate the overall ambience. You can make the best of it by finding creative ways to style and display reed diffusers in your home effortlessly. This will help your room look stunning at all times.

The scent of style Everything depends on choosing a diffuser design that speaks to your soul and compliments your home's overall aesthetic. Choose diffusers that have beautiful bottles, unique shapes, and artistic accents. The colour should also look cohesive with the existing colour palette. You can also go for transparent vessels if you want to let the enchanting colours of the reed diffuser oil shine through. Perfumed placement You should strategically place your reed diffusers. Several places where you can place it are entrances, living rooms, bathrooms, and much more. Ensure to place them on stable surfaces and keep them away from direct sunlight or other such sources. A great tip is to place them near air vents or open windows so the fragrance gracefully glides throughout your abode. You will surely fall in love with the dance of aromas. Elegance elevated If you want to enhance the visual appeal of the reed diffusers:
Place them on decorated trays or plates.
Choose trays that match the overall aesthetic of your home, such as rustic, modern, or even vintage.
Arrange the diffuser bottle, reeds, and any other accessories on a tray to create an organized look.
This can help protect your furniture from spills and also add more sophistication. Perfume ensemble If you want to create a striking display, you can also group different reed diffusers. After that, you can arrange them in a cluster in different locations, such as a shelf, mantlepiece, or even a coffee table. You can mix and match them and can create a beautiful design. You can choose diffusers that have complementary or contrasting scents, as this can add depth and complexity to the overall experience. But make sure to keep ample space between each diffuser so that the fragrance disperses effectively. About House of EM5: House of EM5 is one of the leading companies that can provide a reed diffuser set. All the products that they offer are available at cost-effective prices and also have mesmerizing fragrances. So, incorporating them into your everyday life can surely be a great option. To shop for reed diffusers, visit https://www.houseofem5.com/ Original Source: https://bit.ly/3pXCvh7
0 notes
Text
Essential Oils And Reed Diffusers
Experience the magic of Pristine Aroma's Essential Oils and Reed Diffusers. Our carefully crafted blends of essential oils and elegant reed diffusers infuse your home with soothing, long-lasting fragrances, creating a inviting atmosphere. Explore now!
2 notes
·
View notes
Text
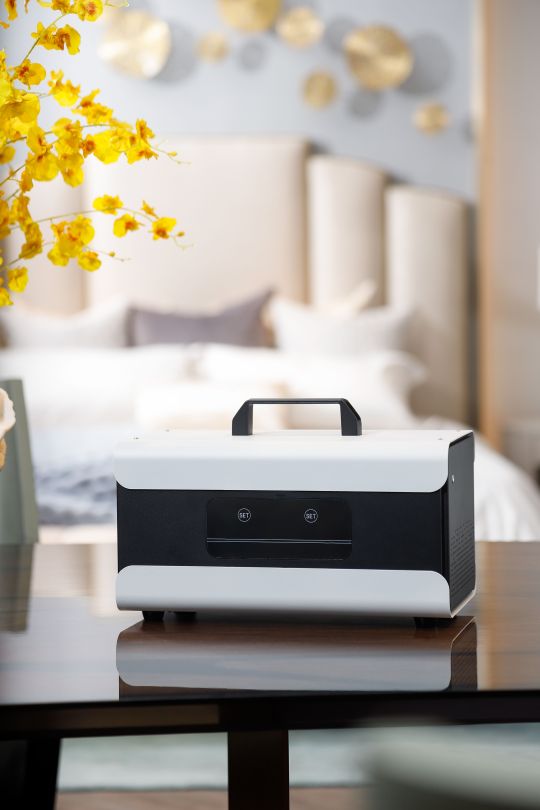


After a series of technical upgrades, bring us a new experience
LK10000 large capacity aroma diffuser machine
-Dimensions: L375 x W185 x H200 mm
-Cover Area:5000 m3
Applicable places: star hotel lobby public space, government, banks, Grade A office buildings, theaters, high-end entertainment clubs, KTV, shopping malls, airports, stations, etc.
#aroma diffuser machine#scent machine#reed diffuser#aromatheray machine#essential oil#machine#hotelscent#hotelscents#scentmarketing#olfactory#aromadiffuser#scentdiffuser#humidifier#fragrancecollection#hotelcollection#odorcontrol#scenta#airpurifier#airfreshener#ароматизация
3 notes
·
View notes
Text
Discover the Magic of Devon Wick Soy Wax Melts: Handmade, Vegan-Friendly, and Perfect for Every Season | Review
Looking for handmade, vegan-friendly soy wax melts, combined with a wide array of seasonal and classic scents?? I've got you covered! Rose xo
If you’re on a quest for captivating home fragrances, look no further than Devon Wick’s soy wax melts. As a loyal fan, I can confidently say these are my favourite soy wax scents, and once you try them, you’ll understand why! Each soy wax melt from Devon Wick is crafted by a dedicated small team in the heart of Devon. This ensures that every product is infused with care and quality. Their…
#all natural wax melts#amazon soy wax#best soy wax for tarts#best soy wax melts#Best vegan soy wax melts#best wax melts#devon live#Devon Wick#Devon wick Christmas#Devon Wick discount code#Devon wick lighter#Devon Wick reed Diffuser#Devon Wick reviews#Devon Wick Trustpilot#Devon wick Wax Melts#disposing of wax melts#Essential Oil Wax Melts UK#how to make soy wax melts with essential oils#how to refresh wax melts#how to remove yankee candle wax melts#how to use wax melts without burner#making soy wax melts with essential oils#natural soy wax candles#natural soy wax melts#natural wax melts#Natural wax melts UK#Non toxic wax melts UK#organic soy wax#organic wax melts#soy wax
0 notes
Photo

Add a fresh scent to your home without overpowering the senses. This natural reed diffuser uses a blend of essential oils and diffuser sticks from your own backyard to naturally neutralize odours and give your home a fresh boost. From stinky pets to musty hallways, sometimes there is no avoiding certain smells in the house. I like to find ways to freshen up the home as naturally as possible. While I love using sprays such as my lavender water, sometimes I don’t always have time to spritz around the house. That’s why I love my natural reed diffuser so much; it keeps everything smelling fresh without me needing to lift a finger. I use them in the bathroom, hallways, and even my bedroom to give off a pleasant aroma that is not too overpowering. Here’s how to make them! I like placing mine in dark, coloured jars. Benefits of a Natural Reed Diffuser By far, this diffuser’s number one selling point is that it is 100% natural. Whenever I have bought reed diffusers in the past, I have always found the scent to be overly harsh and chemical-like. The same can be said for many store-bought candles, plugins, or a cool air diffuser. The artificial fragrances are too irritating for my sensitive nose! Sniffle. I also find that store-bought reed diffusers don’t last very long. While my natural reed diffuser may last the same amount of time, I can refill and refresh it as often as I like. It’s relatively inexpensive to make, so you can have multiple diffusers throughout the home or refills for the same price as a single store-bought one. Of course, you also get to experience the many benefits of essential oils. They can enhance relaxation, reduce stress and anxiety, and even clear toxins from the air. Certainly, no artificial fragrance can do that! You can easily refresh these reed diffusers when the fragrance dissipates. A Natural Pathogen Cleaner Did you know that individuals spend 85% of their time indoors? While I do love to be out in the garden, there is something about curling up inside on a gloomy day that I can really get behind. With all that being said, I do miss the fresh air of the outdoors and do my best to maintain the best air quality indoors whenever I can. Essential oils actually have antimicrobial properties. Some are better than others, with one study finding that oregano, thyme, and lemon oil actually help fight against human pathogens. Another study found that essential oils also work to reduce airborne pathogens by inhibiting their growth in the air. After being exposed to different concentrations of essential oils, the growth of bacterial cells decreased. This is especially meaningful because it makes the air cleaner for allergies and avoids other sensitivities and infections. While essential oils may not turn your air quality into the great outdoors, a little bit of air filtering always helps. And they smell good, too! Essential oils increase the quality of the air around you, whether that’s their fragrance or antimicrobial properties. Which Essential Oils are Best for the Reed Diffuser? The very first question you should answer is what do you like. You will be smelling your reed diffuser oil throughout your home, and you want to ensure that you love it every time you catch a whiff. Next, you can also look for specific aromatherapy benefits each oil may offer. For example, lavender is a popular choice because of its calming scent and microbial and therapeutic properties. You can also go to the other side and choose something to boost your mood naturally. Sweet orange is great for lifting the spirits and is very fragrant. Feel free to get crafty and mix scents together. My secret combo is mixing the two scents together! Lavender and sweet orange smell lovely together in my go-to, balanced blend. Make a few tester combinations first in small quantities. Fun Scent Combinations Balanced Blend: lavender and sweet orange. Fresh Air: pine, eucalyptus, peppermint, and lavender. Calm: lavender, tangerine, ylang ylang, and clary sage. Wake Up: rosemary, cedarwood, mint, and black pepper. Immune Boost: clove, lemon, rosemary, cinnamon bark, and thyme. Sweet Dreams: bergamot, lavender, and marjoram. Good Morning: peppermint, fir, and lemon. Citrus Celebration: bergamot, grapefruit, and lime. Happy Day: lemongrass, tangerine, and sweet orange. Harmony: lavender, geranium, and bergamot. Walk in the Woods: fir, clove, and cedarwood. Before you use essential oils, be sure to read all warnings. They are powerful plant extracts that can cause issues with people when used inappropriately. They can bother pregnant women, those breastfeeding, and even pets. Most essential oils will have warnings on them that tell you if they are not suitable for a specific use. Watch the DIY Natural Reed Diffuser Video! How to Make Reed Diffuser Oil How to Make Reed Diffuser Oil There are a ton of options when it comes to making your natural reed diffuser. The oil has three key components: carrier oil, essential oils, and alcohol. The first thing you will want to decide is what base you would like to use. Most recipes can be made using an oil or an alcohol base. Whichever you choose, you want to make sure it has a minimal scent. For an alcohol base, vodka and water make a great combo, as it will travel easily through the reed diffuser sticks. However, you will find that it evaporates much quicker than an oil base. If you do use this method, use distilled water, as it will last longer since it is purified. I prefer to use an oil base. The trick is to use an oil that is thin enough to travel up through the stems of the reed sticks. Oils that are good for a natural reed diffuser include fractionated coconut oil, safflower oil, sweet almond oil, sunflower oil, and grapeseed oil. I would suggest avoiding any mineral oils as they are petroleum-based. Use a lightweight oil that can travel up the reed sticks. Once you have decided on your base, you will want to proportion your reed diffuser oil to 30% essential oil and 70% base. You can measure this out if you prefer, but I like just to eyeball it. Pour your oil into a glass or ceramic container that doesn’t leak with a narrow opening at the top. A narrow opening ensures that the oil won’t evaporate too quickly. I also prefer a darker-coloured bottle as essential oils degrade after sun exposure. You can find a ton of cool containers at your local thrift store or can re-purpose an existing container in your home. If you’re using an oil, you will still need to add a hint of alcohol to the recipe as it acts as a binder for the oil and will help to thin it. You can use grain alcohol, but I like to use isopropyl. Anything 90% or higher is preferable. This way, the recipe only needs a couple of drops of alcohol. Three ingredients are all you need to make the oil base for your reed diffuser. How to Make Reed Diffuser Sticks Now that you have your base and container, it’s time to find some reed diffuser sticks! Like your oil, you can play around with some options here as well. Bamboo skewers and rattan reeds are by far the most popular. However, I like to turn to my own garden whenever possible! By carefully looking through your garden and perennials, you may have some sticks and stems that will work as well. When choosing a stick for your diffuser, you don’t want anything solid: it must be porous for the liquid to travel up and diffuse. I found the natural reeds that work best come from flower stalks! I used poppies, daylilies, and echinacea for my diffuser but there are a ton of different ones you can use. Every year, I always dry the flowers and seed heads from my perennials and am left with the stems. Now I have something to use them for! To use natural sticks, thoroughly clean them of leaves, dirt, and sprigs. If the stick you are using has bark, you will need to peel at least half of it from top to bottom to help the liquid travel up. Bake the sticks at 200 F for 25-60 minutes to dry out the sticks and be ready for use. Once complete, fill your container opening with as many reeds as possible to keep the liquid from evaporating too quickly. Make sure your reeds are porous. Sticks with hollow centers work best as reeds. Tips and Tricks for Reed Diffusing Placement Where you decide to place your reed diffuser can actually make a huge difference in how well it will perform. You want to try to place it in an out-of-reach spot, away from little fingers and paws but aim for a spot where movement will help to circulate the air and the scents. Placing it near a vent can actually help to circulate the scent. Heat and sunlight will also aid it in a stronger smell, but it will last for a shorter period of time. Avoid warmth for a longer-lasting diffusion. Remember, this diffuser will not be a strong smell. They are meant to diffuse subtle fragrances for the everyday house. It works best in an enclosed place, such as a bathroom, or you won’t really notice the smell. You can use bigger containers for larger rooms to get a better diffusion of smell, but it can get pricey, considering how much essential oil you will need to fill the container. This is why I prefer small containers in small rooms. Hallways, where lots of movement passes by, are great spots for this natural diffuser. Reeds In order to get the most out of your natural reed diffuser, you will want to give the reeds some attention. While I say reeds, this will apply to whichever kind of sticks you choose to diffuse the oil. Rotate which reed ends are in the solution once a week to help refresh the scent. Reeds will need to be replaced every 4-6 months. After a while, they stop diffusing the oil. This also helps to avoid any rotting stems. After 4-6 months, compost the reeds and replace them with new ones from your garden. Oil You will likely need to replace the oil monthly as it will slowly lose its scent. To ensure you are not wasting oil, only fill your container up halfway at a time. I suggest creating batches and storing them in a mason jar until ready to use. This way, you have it ready to go whenever it needs a top-up or replacement! Replace your oil every month to keep the scent fresh. More Ways to Use Essential Oils to Freshen Your Space How to Make a Natural Reed Diffuser Looking for a simple, natural way to freshen up your space? Add a few of these pretty natural reed diffusers with homemade diffuser oil. oil to use as base I like fractionated coconut oil, safflower oil, sweet almond oil, sunflower oil, and grapeseed oil.essential oils of your choicenatural reeds Bamboo skewers, rattan reeds, sticks or stems from your garden – just make sure it is porous so the liquid can travel through them. Mix together a combination of 70% oil and 30% essential oils.Add reed oil to the jar, and add your reeds. Place the natural reed diffuser out and enjoy! I've found they work best in enclosed spaces such as bathrooms. They also work well near an air vent or in front of a window. Source link
#PLANTS_AND_SEEDS#DIFFUSER#DIY#ESSENTIAL#ESSENTIAL_OIL#ESSENTIAL_OILS#FRESHEN#GARDEN#HOME#MONTH_JANUARY_WEEK_4#NATURAL#OILS#REED#THERAPY
0 notes
Text
Tea Light Candles Price | Aura Decor
Aura Decor has an exclusive range of scented tea light candles in India. Buy the best quality scented tea light candles online at the lowest price. Visit our store to place your order.

#Tea Light Candles Pricer#Aura Decor#Electric Diffuser for Home#Reed Diffuser Oil#Wholesale Tealight Candles
0 notes
Photo

Add a fresh scent to your home without overpowering the senses. This natural reed diffuser uses a blend of essential oils and diffuser sticks from your own backyard to naturally neutralize odours and give your home a fresh boost. From stinky pets to musty hallways, sometimes there is no avoiding certain smells in the house. I like to find ways to freshen up the home as naturally as possible. While I love using sprays such as my lavender water, sometimes I don’t always have time to spritz around the house. That’s why I love my natural reed diffuser so much; it keeps everything smelling fresh without me needing to lift a finger. I use them in the bathroom, hallways, and even my bedroom to give off a pleasant aroma that is not too overpowering. Here’s how to make them! I like placing mine in dark, coloured jars. Benefits of a Natural Reed Diffuser By far, this diffuser’s number one selling point is that it is 100% natural. Whenever I have bought reed diffusers in the past, I have always found the scent to be overly harsh and chemical-like. The same can be said for many store-bought candles, plugins, or a cool air diffuser. The artificial fragrances are too irritating for my sensitive nose! Sniffle. I also find that store-bought reed diffusers don’t last very long. While my natural reed diffuser may last the same amount of time, I can refill and refresh it as often as I like. It’s relatively inexpensive to make, so you can have multiple diffusers throughout the home or refills for the same price as a single store-bought one. Of course, you also get to experience the many benefits of essential oils. They can enhance relaxation, reduce stress and anxiety, and even clear toxins from the air. Certainly, no artificial fragrance can do that! You can easily refresh these reed diffusers when the fragrance dissipates. A Natural Pathogen Cleaner Did you know that individuals spend 85% of their time indoors? While I do love to be out in the garden, there is something about curling up inside on a gloomy day that I can really get behind. With all that being said, I do miss the fresh air of the outdoors and do my best to maintain the best air quality indoors whenever I can. Essential oils actually have antimicrobial properties. Some are better than others, with one study finding that oregano, thyme, and lemon oil actually help fight against human pathogens. Another study found that essential oils also work to reduce airborne pathogens by inhibiting their growth in the air. After being exposed to different concentrations of essential oils, the growth of bacterial cells decreased. This is especially meaningful because it makes the air cleaner for allergies and avoids other sensitivities and infections. While essential oils may not turn your air quality into the great outdoors, a little bit of air filtering always helps. And they smell good, too! Essential oils increase the quality of the air around you, whether that’s their fragrance or antimicrobial properties. Which Essential Oils are Best for the Reed Diffuser? The very first question you should answer is what do you like. You will be smelling your reed diffuser oil throughout your home, and you want to ensure that you love it every time you catch a whiff. Next, you can also look for specific aromatherapy benefits each oil may offer. For example, lavender is a popular choice because of its calming scent and microbial and therapeutic properties. You can also go to the other side and choose something to boost your mood naturally. Sweet orange is great for lifting the spirits and is very fragrant. Feel free to get crafty and mix scents together. My secret combo is mixing the two scents together! Lavender and sweet orange smell lovely together in my go-to, balanced blend. Make a few tester combinations first in small quantities. Fun Scent Combinations Balanced Blend: lavender and sweet orange. Fresh Air: pine, eucalyptus, peppermint, and lavender. Calm: lavender, tangerine, ylang ylang, and clary sage. Wake Up: rosemary, cedarwood, mint, and black pepper. Immune Boost: clove, lemon, rosemary, cinnamon bark, and thyme. Sweet Dreams: bergamot, lavender, and marjoram. Good Morning: peppermint, fir, and lemon. Citrus Celebration: bergamot, grapefruit, and lime. Happy Day: lemongrass, tangerine, and sweet orange. Harmony: lavender, geranium, and bergamot. Walk in the Woods: fir, clove, and cedarwood. Before you use essential oils, be sure to read all warnings. They are powerful plant extracts that can cause issues with people when used inappropriately. They can bother pregnant women, those breastfeeding, and even pets. Most essential oils will have warnings on them that tell you if they are not suitable for a specific use. Watch the DIY Natural Reed Diffuser Video! How to Make Reed Diffuser Oil How to Make Reed Diffuser Oil There are a ton of options when it comes to making your natural reed diffuser. The oil has three key components: carrier oil, essential oils, and alcohol. The first thing you will want to decide is what base you would like to use. Most recipes can be made using an oil or an alcohol base. Whichever you choose, you want to make sure it has a minimal scent. For an alcohol base, vodka and water make a great combo, as it will travel easily through the reed diffuser sticks. However, you will find that it evaporates much quicker than an oil base. If you do use this method, use distilled water, as it will last longer since it is purified. I prefer to use an oil base. The trick is to use an oil that is thin enough to travel up through the stems of the reed sticks. Oils that are good for a natural reed diffuser include fractionated coconut oil, safflower oil, sweet almond oil, sunflower oil, and grapeseed oil. I would suggest avoiding any mineral oils as they are petroleum-based. Use a lightweight oil that can travel up the reed sticks. Once you have decided on your base, you will want to proportion your reed diffuser oil to 30% essential oil and 70% base. You can measure this out if you prefer, but I like just to eyeball it. Pour your oil into a glass or ceramic container that doesn’t leak with a narrow opening at the top. A narrow opening ensures that the oil won’t evaporate too quickly. I also prefer a darker-coloured bottle as essential oils degrade after sun exposure. You can find a ton of cool containers at your local thrift store or can re-purpose an existing container in your home. If you’re using an oil, you will still need to add a hint of alcohol to the recipe as it acts as a binder for the oil and will help to thin it. You can use grain alcohol, but I like to use isopropyl. Anything 90% or higher is preferable. This way, the recipe only needs a couple of drops of alcohol. Three ingredients are all you need to make the oil base for your reed diffuser. How to Make Reed Diffuser Sticks Now that you have your base and container, it’s time to find some reed diffuser sticks! Like your oil, you can play around with some options here as well. Bamboo skewers and rattan reeds are by far the most popular. However, I like to turn to my own garden whenever possible! By carefully looking through your garden and perennials, you may have some sticks and stems that will work as well. When choosing a stick for your diffuser, you don’t want anything solid: it must be porous for the liquid to travel up and diffuse. I found the natural reeds that work best come from flower stalks! I used poppies, daylilies, and echinacea for my diffuser but there are a ton of different ones you can use. Every year, I always dry the flowers and seed heads from my perennials and am left with the stems. Now I have something to use them for! To use natural sticks, thoroughly clean them of leaves, dirt, and sprigs. If the stick you are using has bark, you will need to peel at least half of it from top to bottom to help the liquid travel up. Bake the sticks at 200 F for 25-60 minutes to dry out the sticks and be ready for use. Once complete, fill your container opening with as many reeds as possible to keep the liquid from evaporating too quickly. Make sure your reeds are porous. Sticks with hollow centers work best as reeds. Tips and Tricks for Reed Diffusing Placement Where you decide to place your reed diffuser can actually make a huge difference in how well it will perform. You want to try to place it in an out-of-reach spot, away from little fingers and paws but aim for a spot where movement will help to circulate the air and the scents. Placing it near a vent can actually help to circulate the scent. Heat and sunlight will also aid it in a stronger smell, but it will last for a shorter period of time. Avoid warmth for a longer-lasting diffusion. Remember, this diffuser will not be a strong smell. They are meant to diffuse subtle fragrances for the everyday house. It works best in an enclosed place, such as a bathroom, or you won’t really notice the smell. You can use bigger containers for larger rooms to get a better diffusion of smell, but it can get pricey, considering how much essential oil you will need to fill the container. This is why I prefer small containers in small rooms. Hallways, where lots of movement passes by, are great spots for this natural diffuser. Reeds In order to get the most out of your natural reed diffuser, you will want to give the reeds some attention. While I say reeds, this will apply to whichever kind of sticks you choose to diffuse the oil. Rotate which reed ends are in the solution once a week to help refresh the scent. Reeds will need to be replaced every 4-6 months. After a while, they stop diffusing the oil. This also helps to avoid any rotting stems. After 4-6 months, compost the reeds and replace them with new ones from your garden. Oil You will likely need to replace the oil monthly as it will slowly lose its scent. To ensure you are not wasting oil, only fill your container up halfway at a time. I suggest creating batches and storing them in a mason jar until ready to use. This way, you have it ready to go whenever it needs a top-up or replacement! Replace your oil every month to keep the scent fresh. More Ways to Use Essential Oils to Freshen Your Space How to Make a Natural Reed Diffuser Looking for a simple, natural way to freshen up your space? Add a few of these pretty natural reed diffusers with homemade diffuser oil. oil to use as base I like fractionated coconut oil, safflower oil, sweet almond oil, sunflower oil, and grapeseed oil.essential oils of your choicenatural reeds Bamboo skewers, rattan reeds, sticks or stems from your garden – just make sure it is porous so the liquid can travel through them. Mix together a combination of 70% oil and 30% essential oils.Add reed oil to the jar, and add your reeds. Place the natural reed diffuser out and enjoy! I've found they work best in enclosed spaces such as bathrooms. They also work well near an air vent or in front of a window. Source link
#PLANTS_AND_SEEDS#DIFFUSER#DIY#ESSENTIAL#ESSENTIAL_OIL#ESSENTIAL_OILS#FRESHEN#GARDEN#HOME#MONTH_JANUARY_WEEK_4#NATURAL#OILS#REED#THERAPY
0 notes
Photo
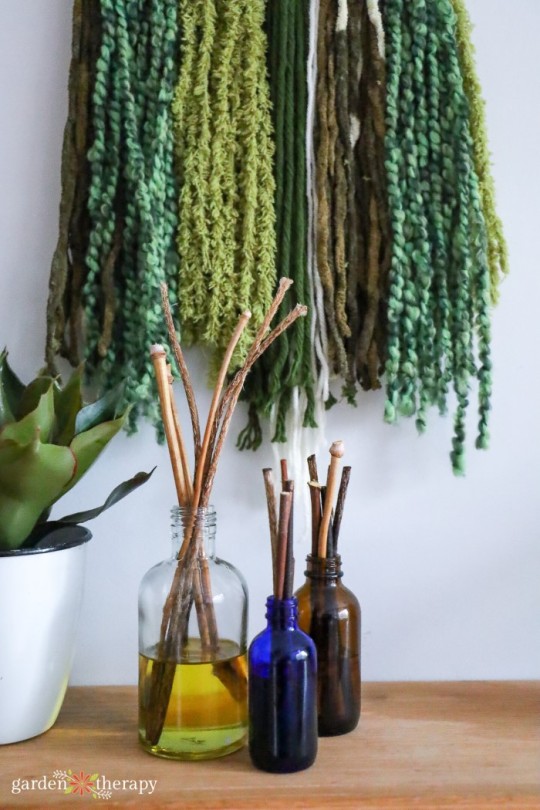
Add a fresh scent to your home without overpowering the senses. This natural reed diffuser uses a blend of essential oils and diffuser sticks from your own backyard to naturally neutralize odours and give your home a fresh boost. From stinky pets to musty hallways, sometimes there is no avoiding certain smells in the house. I like to find ways to freshen up the home as naturally as possible. While I love using sprays such as my lavender water, sometimes I don’t always have time to spritz around the house. That’s why I love my natural reed diffuser so much; it keeps everything smelling fresh without me needing to lift a finger. I use them in the bathroom, hallways, and even my bedroom to give off a pleasant aroma that is not too overpowering. Here’s how to make them! I like placing mine in dark, coloured jars. Benefits of a Natural Reed Diffuser By far, this diffuser’s number one selling point is that it is 100% natural. Whenever I have bought reed diffusers in the past, I have always found the scent to be overly harsh and chemical-like. The same can be said for many store-bought candles, plugins, or a cool air diffuser. The artificial fragrances are too irritating for my sensitive nose! Sniffle. I also find that store-bought reed diffusers don’t last very long. While my natural reed diffuser may last the same amount of time, I can refill and refresh it as often as I like. It’s relatively inexpensive to make, so you can have multiple diffusers throughout the home or refills for the same price as a single store-bought one. Of course, you also get to experience the many benefits of essential oils. They can enhance relaxation, reduce stress and anxiety, and even clear toxins from the air. Certainly, no artificial fragrance can do that! You can easily refresh these reed diffusers when the fragrance dissipates. A Natural Pathogen Cleaner Did you know that individuals spend 85% of their time indoors? While I do love to be out in the garden, there is something about curling up inside on a gloomy day that I can really get behind. With all that being said, I do miss the fresh air of the outdoors and do my best to maintain the best air quality indoors whenever I can. Essential oils actually have antimicrobial properties. Some are better than others, with one study finding that oregano, thyme, and lemon oil actually help fight against human pathogens. Another study found that essential oils also work to reduce airborne pathogens by inhibiting their growth in the air. After being exposed to different concentrations of essential oils, the growth of bacterial cells decreased. This is especially meaningful because it makes the air cleaner for allergies and avoids other sensitivities and infections. While essential oils may not turn your air quality into the great outdoors, a little bit of air filtering always helps. And they smell good, too! Essential oils increase the quality of the air around you, whether that’s their fragrance or antimicrobial properties. Which Essential Oils are Best for the Reed Diffuser? The very first question you should answer is what do you like. You will be smelling your reed diffuser oil throughout your home, and you want to ensure that you love it every time you catch a whiff. Next, you can also look for specific aromatherapy benefits each oil may offer. For example, lavender is a popular choice because of its calming scent and microbial and therapeutic properties. You can also go to the other side and choose something to boost your mood naturally. Sweet orange is great for lifting the spirits and is very fragrant. Feel free to get crafty and mix scents together. My secret combo is mixing the two scents together! Lavender and sweet orange smell lovely together in my go-to, balanced blend. Make a few tester combinations first in small quantities. Fun Scent Combinations Balanced Blend: lavender and sweet orange. Fresh Air: pine, eucalyptus, peppermint, and lavender. Calm: lavender, tangerine, ylang ylang, and clary sage. Wake Up: rosemary, cedarwood, mint, and black pepper. Immune Boost: clove, lemon, rosemary, cinnamon bark, and thyme. Sweet Dreams: bergamot, lavender, and marjoram. Good Morning: peppermint, fir, and lemon. Citrus Celebration: bergamot, grapefruit, and lime. Happy Day: lemongrass, tangerine, and sweet orange. Harmony: lavender, geranium, and bergamot. Walk in the Woods: fir, clove, and cedarwood. Before you use essential oils, be sure to read all warnings. They are powerful plant extracts that can cause issues with people when used inappropriately. They can bother pregnant women, those breastfeeding, and even pets. Most essential oils will have warnings on them that tell you if they are not suitable for a specific use. Watch the DIY Natural Reed Diffuser Video! How to Make Reed Diffuser Oil How to Make Reed Diffuser Oil There are a ton of options when it comes to making your natural reed diffuser. The oil has three key components: carrier oil, essential oils, and alcohol. The first thing you will want to decide is what base you would like to use. Most recipes can be made using an oil or an alcohol base. Whichever you choose, you want to make sure it has a minimal scent. For an alcohol base, vodka and water make a great combo, as it will travel easily through the reed diffuser sticks. However, you will find that it evaporates much quicker than an oil base. If you do use this method, use distilled water, as it will last longer since it is purified. I prefer to use an oil base. The trick is to use an oil that is thin enough to travel up through the stems of the reed sticks. Oils that are good for a natural reed diffuser include fractionated coconut oil, safflower oil, sweet almond oil, sunflower oil, and grapeseed oil. I would suggest avoiding any mineral oils as they are petroleum-based. Use a lightweight oil that can travel up the reed sticks. Once you have decided on your base, you will want to proportion your reed diffuser oil to 30% essential oil and 70% base. You can measure this out if you prefer, but I like just to eyeball it. Pour your oil into a glass or ceramic container that doesn’t leak with a narrow opening at the top. A narrow opening ensures that the oil won’t evaporate too quickly. I also prefer a darker-coloured bottle as essential oils degrade after sun exposure. You can find a ton of cool containers at your local thrift store or can re-purpose an existing container in your home. If you’re using an oil, you will still need to add a hint of alcohol to the recipe as it acts as a binder for the oil and will help to thin it. You can use grain alcohol, but I like to use isopropyl. Anything 90% or higher is preferable. This way, the recipe only needs a couple of drops of alcohol. Three ingredients are all you need to make the oil base for your reed diffuser. How to Make Reed Diffuser Sticks Now that you have your base and container, it’s time to find some reed diffuser sticks! Like your oil, you can play around with some options here as well. Bamboo skewers and rattan reeds are by far the most popular. However, I like to turn to my own garden whenever possible! By carefully looking through your garden and perennials, you may have some sticks and stems that will work as well. When choosing a stick for your diffuser, you don’t want anything solid: it must be porous for the liquid to travel up and diffuse. I found the natural reeds that work best come from flower stalks! I used poppies, daylilies, and echinacea for my diffuser but there are a ton of different ones you can use. Every year, I always dry the flowers and seed heads from my perennials and am left with the stems. Now I have something to use them for! To use natural sticks, thoroughly clean them of leaves, dirt, and sprigs. If the stick you are using has bark, you will need to peel at least half of it from top to bottom to help the liquid travel up. Bake the sticks at 200 F for 25-60 minutes to dry out the sticks and be ready for use. Once complete, fill your container opening with as many reeds as possible to keep the liquid from evaporating too quickly. Make sure your reeds are porous. Sticks with hollow centers work best as reeds. Tips and Tricks for Reed Diffusing Placement Where you decide to place your reed diffuser can actually make a huge difference in how well it will perform. You want to try to place it in an out-of-reach spot, away from little fingers and paws but aim for a spot where movement will help to circulate the air and the scents. Placing it near a vent can actually help to circulate the scent. Heat and sunlight will also aid it in a stronger smell, but it will last for a shorter period of time. Avoid warmth for a longer-lasting diffusion. Remember, this diffuser will not be a strong smell. They are meant to diffuse subtle fragrances for the everyday house. It works best in an enclosed place, such as a bathroom, or you won’t really notice the smell. You can use bigger containers for larger rooms to get a better diffusion of smell, but it can get pricey, considering how much essential oil you will need to fill the container. This is why I prefer small containers in small rooms. Hallways, where lots of movement passes by, are great spots for this natural diffuser. Reeds In order to get the most out of your natural reed diffuser, you will want to give the reeds some attention. While I say reeds, this will apply to whichever kind of sticks you choose to diffuse the oil. Rotate which reed ends are in the solution once a week to help refresh the scent. Reeds will need to be replaced every 4-6 months. After a while, they stop diffusing the oil. This also helps to avoid any rotting stems. After 4-6 months, compost the reeds and replace them with new ones from your garden. Oil You will likely need to replace the oil monthly as it will slowly lose its scent. To ensure you are not wasting oil, only fill your container up halfway at a time. I suggest creating batches and storing them in a mason jar until ready to use. This way, you have it ready to go whenever it needs a top-up or replacement! Replace your oil every month to keep the scent fresh. More Ways to Use Essential Oils to Freshen Your Space How to Make a Natural Reed Diffuser Looking for a simple, natural way to freshen up your space? Add a few of these pretty natural reed diffusers with homemade diffuser oil. oil to use as base I like fractionated coconut oil, safflower oil, sweet almond oil, sunflower oil, and grapeseed oil.essential oils of your choicenatural reeds Bamboo skewers, rattan reeds, sticks or stems from your garden – just make sure it is porous so the liquid can travel through them. Mix together a combination of 70% oil and 30% essential oils.Add reed oil to the jar, and add your reeds. Place the natural reed diffuser out and enjoy! I've found they work best in enclosed spaces such as bathrooms. They also work well near an air vent or in front of a window. Source link
#PLANTS_AND_SEEDS#DIFFUSER#DIY#ESSENTIAL#ESSENTIAL_OIL#ESSENTIAL_OILS#FRESHEN#GARDEN#HOME#MONTH_JANUARY_WEEK_4#NATURAL#OILS#REED#THERAPY
0 notes